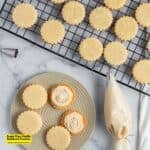
Sugar Free Vanilla Sandwich Cookies
Sugar Free Vanilla Sandwich Cookies, a delicious no added sugar cookie recipe featuring a creamy filling between two buttery cookies
Servings: 34
Ingredients
Cookies.
- 1 cup Butter. - softened to room temperature.
- ⅔ cup Sugar Alternative. -granular sugar alternative that measures like sugar and that can also be baked with.
- 2 tsp Vanilla Extract. -Pure vanilla extract is preferred
- 1 tbsp Lemon Juice.
- 1 Egg Yolk.
- 2¼ cups All Purpose Flour
Filling
- ½ cup Butter. -Softened
- 1¾ cups Sugar Free Powdered Sugar - Sifted
- 2 tsp Vanilla Extract.
- 2 tbsp Heavy Cream. -Can be adjusted for consistency
Instructions
- Cream. In a large mixing bowl and a mixer outfitted with a paddle beater, beat your butter until smooth and creamy (about two to three minutes). Add the sugar alternative to the mixing bowl and continue to beat until creamy and well incorporated.
- Flavors. Use a rubber spatula to scrape down the sides of your mixing bowl. Then use the spatula to mix in the in the vanilla extract, lemon juice, and the egg yolk.
- Flour. Scrape down the sides of your mixing bowl and then set your mixer speed on low. Gradually add the flour to the mixing bowl, mixing until just combined.
- Wrap. Lay out two pieces of plastic wrap on a flat surface. Place half of your cookie dough onto the center of each of the pieces of wrap. Then shape each of the dough pieces into a disc shape (about an inch thick), wrap with the surrounding plastic, and refrigerate for at least 10 minutes.
- Prepare. When you are ready to make your cookies, preheat your oven to 350°F, prep your baking sheets for nonstick, and lightly dust a clean workspace with flour.
- Shape. Take one of your cookie discs out of your refrigerator, remove the plastic, and then roll it out to about ¼ inch thickness using a lightly floured rolling pin. Lightly flour your cookie cutter before cutting out the cookies.
- Bake. Place your cut out cookies on to your prepared baking sheet about an inch apart from one another. Then bake your cookies for eight to 10 minutes or until the edges turn golden brown. While the cookies are baking you can repeat the process with the remaining cookie dough disc.
- Cool. Let the cookies sit on the baking sheet for one minute before transferring them to a cooling rack to fully cool.
- Filling. To make the filling, start by beating the butter until creamy (about two to two and a half minutes). Scrape down the sides of the bowl and set your mixer speed to slow. Slowly add the powdered sugar alternative. Then add your vanilla extract along with a tablespoon of the heavy cream. Beat this until smooth, adding additional heavy cream as needed.
- Assemble. Place your cooled cookies in pairs on a clean workspace with the bottom sides facing you. You can then use a piping bag or teaspoon to coat half of the cookies to about a quarter inch of the edges with the filling. Then place the uncoated cookies on top with the side that is facing you going on top of the filling to create your sandwiches. You may need to gently press the top cookies in place.
Recipe Notes
*Please check the nutritional labels to assure that you are sticking to your diet restrictions for any substitutions used.
Also, please see the actual recipe post for further details on this recipe. Nutritional Information is only an estimate and can vary especially with ingredients that are used. See thesugarfreediva.com for details on this recipe.
Also, please see the actual recipe post for further details on this recipe. Nutritional Information is only an estimate and can vary especially with ingredients that are used. See thesugarfreediva.com for details on this recipe.
posted:
April 29, 2025*About Sugar Alternatives
Specific sugar alternatives are not given in the recipes presented on this site. Only suggestions are given as to the 'kind' of alternative to use. It is up to you to select the alternative to use that suits your needs best. If the recipe is heated or cooked, it is best to use an alternative that can be heated or cooked with for best results. This site does not endorse any specific ingredients,
*As an Amazon Associate I earn from qualifying purchases. This means that the links on this website, and specifically on this post, that lead to other sites may be affiliate links.
Nutrition
Calories: 108kcal | Carbohydrates: 9g | Protein: 1g | Fat: 9g | Saturated Fat: 5g | Polyunsaturated Fat: 0.4g | Monounsaturated Fat: 2g | Trans Fat: 0.3g | Cholesterol: 28mg | Sodium: 65mg | Potassium: 14mg | Fiber: 0.2g | Sugar: 0.1g | Vitamin A: 271IU | Vitamin C: 0.2mg | Calcium: 5mg | Iron: 0.4mg
Please note: Nutritional data has been calculated using a tool that comes with this recipe card and not by me. This means that Nutritional Information is only an estimate and can vary especially with ingredients that you use. The accuracy of this tool may differ from other tools as expected. Also note that there is no instructional value to the video that may be attached to this recipe. It is only there for visual pleasure. For more information about the images in this recipe, please refer the the recipe instructions. Thank you!
Follow Me